
Appium has been the industry standard for mobile test automation for over a decade, a free, open-source, cross-platform framework used by teams from startups to Fortune 500 enterprises to automate native, hybrid, and mobile web apps across Android and iOS. If you're new to Appium or want the full picture of how it works, its architecture, and the modern alternatives emerging in 2026, check out our comprehensive guide: What is Appium? Full Tutorial + Modern Alternatives (2026 Guide).
But once you understand what Appium is, the next question every QA engineer faces is practical: how do you actually find the elements you need to test?
That's where Appium Inspector comes in and where most of the real time investment begins. Before a single line of automation code runs, someone has to open Inspector, click through the app screen by screen, identify each UI element, copy its locator, decide which locator strategy is most stable, and then hardcode that locator into a test script.
For over a decade, this has been the standard workflow. And Appium Inspector, the GUI tool that makes it possible has been an indispensable part of every mobile QA engineer's toolkit.
But here's the question worth asking: What if you didn't need to inspect elements at all?
In this guide, we'll walk through everything you need to know about Appium Inspector, what it does, how to set it up, how to use it effectively, and the best practices that experienced QA teams rely on. Then we'll explore why Vision AI testing tools like Drizz have made element inspection an optional step rather than a mandatory one.
Key Takeaways
- Appium Inspector is a GUI tool that lets you visually explore your app's UI hierarchy, inspect element attributes, generate locators, and debug Appium test sessions.
- It operates as an Appium client connecting to a running Appium server to display screenshots, XML element trees, and element metadata in real time.
- Choosing the right locator strategy (Accessibility ID > ID > Class Name > XPath) is critical because locator quality directly determines test stability.
- The Inspector workflow inspect, copy locator, paste into code, validate, repeat is the single biggest time investment in Appium test creation.
- Vision AI tools like Drizz bypass this entire workflow by identifying elements visually, eliminating the need for element inspection, locator selection, and selector maintenance.
What is Appium Inspector?
Appium Inspector is a graphical user interface (GUI) tool built for the Appium ecosystem. It lets you connect to a running Appium session, see a live screenshot of your app, and explore the complete UI hierarchy of every button, text field, image, container, and scroll view as a structured XML tree.
When you click on any element in the screenshot or the XML tree, the Inspector shows you its attributes: resource ID, accessibility ID, class name, text content, bounds (position and size), and more. Most importantly, it suggests locator strategies you can use to find that element in your test scripts.
Think of it as Chrome DevTools, but for mobile apps. Where Chrome DevTools lets web developers inspect HTML elements and CSS properties, Appium Inspector does the same thing for native and hybrid mobile app elements.
How It's Available
Appium Inspector comes in two formats:
Desktop Application A standalone app for macOS, Windows, and Linux, downloadable from the project's GitHub releases page. This is the most common way teams use it.
Appium Server Plugin Starting with Appium 2.0, the Inspector can be installed as a plugin that runs directly within your Appium server, accessible via browser at the /inspector path.
There was previously a hosted web version at inspector.appiumpro.com, but the Appium team no longer maintains it. The desktop app and plugin are the recommended options.
Why QA Teams Rely on It
Appium Inspector isn't just a nice-to-have for teams using Appium, it's essential. Here's why:
Element identification. Without Inspector, you'd need to read raw XML page source or guess at element attributes. Inspector gives you a point-and-click interface to explore every visible (and hidden) element on screen.
Locator generation. When you select an element, the inspector suggests the best locator strategies. Accessibility ID, ID, XPath, Class Name and provides the exact selector strings ready to copy into your code.
Real-time interaction. You can tap buttons, type into fields, swipe, and scroll all from within the Inspector to test interactions before writing automation code.
Action recording. Inspector can record your manual interactions and generate corresponding code snippets in Java, Python, JavaScript, Ruby, and other supported languages.
Session debugging. When a test fails because an element can't be found, Inspector lets you open the same session, navigate to the failing screen, and visually verify whether the element exists, has changed attributes, or has moved in the hierarchy.
Setting Up Appium Inspector
Prerequisites
Before launching Inspector, you need a running Appium server and a connected device or emulator.
Required
- Appium server installed and running (npm install -g appium, then appium)
- A connected Android device/emulator or iOS simulator
- For Android: Android SDK with platform-tools configured
- For iOS: Xcode installed on macOS with a simulator ready
Installing the Desktop App
- Go to the Appium Inspector GitHub Releases page.
- Download the appropriate file for your OS:
- Windows: .exe installer (recommended for auto-update support)
- macOS: .dmg file drag to Applications folder
- Linux: .AppImage or .tar.gz
- On macOS, you'll hit a security warning since the app isn't notarized. Run this in Terminal to bypass it: xattr -cr /Applications/Appium\ Inspector.app. On macOS Ventura and later, you may also need to go to System Settings → Privacy & Security and click 'Open Anyway' after running the command above.
- Launch the app.
Installing as an Appium Plugin
If you prefer the browser-based version:
appium plugin install --source=npm appium-inspector-plugin
appium --use-plugins=inspector
Then open your browser to http://localhost:4723/inspector.
Connecting to Your Appium Server
When Inspector opens, you'll see the Session Builder the landing screen where you configure your connection:
Remote Host: 127.0.0.1 (default, for a local Appium server) Remote Port: 4723 (Appium's default port) Remote Path: / (default for Appium 2.x)
If you're using a cloud provider like BrowserStack or Sauce Labs, Inspector has built-in integrations select your provider from the tabs and enter your credentials.
Configuring Desired Capabilities
This is where you tell the Inspector which device and app to connect to. Add capabilities as key-value pairs:
For Android:
{
  "platformName": "Android",
  "appium:automationName": "UiAutomator2",
  "appium:deviceName": "Pixel_6_API_33",
  "appium:app": "/path/to/your/app.apk",
  "appium:appPackage": "com.example.myapp",
  "appium:appActivity": "com.example.myapp.MainActivity"
}
For iOS:
{
  "platformName": "iOS",
  "appium:automationName": "XCUITest",
  "appium:deviceName": "iPhone 15 Pro",
  "appium:platformVersion": "17.4",
  "appium:app": "/path/to/your/app.ipa"
}
Pro tip: Save your capability sets with descriptive names ("Pixel 6 - Production App", "iPhone 15 - Staging") so you can switch between configurations without re-entering everything each time.
Click Start Session and Inspector will connect to the Appium server, install your app on the device, and display the first screen.
Using Appium Inspector: The Core Workflow
Once your session is running, Inspector shows three panels:
Left panel A live screenshot of your app on the device. Center panel The XML source tree (the complete UI hierarchy). Right panel Element details and suggested locators for the selected element.
Step 1: Identify the Element
Click on any element in the screenshot (or navigate the XML tree) to select it. Inspector highlights the element with a blue rectangle on the screenshot and scrolls to its position in the XML tree.
Step 2: Read Element Attributes
The right panel shows every attribute of the selected element:
- resource-id : The developer-assigned ID (Android)
- accessibility-id / content-desc : The accessibility identifier
- class : The UI component type (e.g., android.widget.Button)
- text : Visible text content
- bounds : Screen coordinates and dimensions
- enabled / displayed / selected : State properties
- name / label : iOS-specific identifiers
Step 3: Choose a Locator Strategy
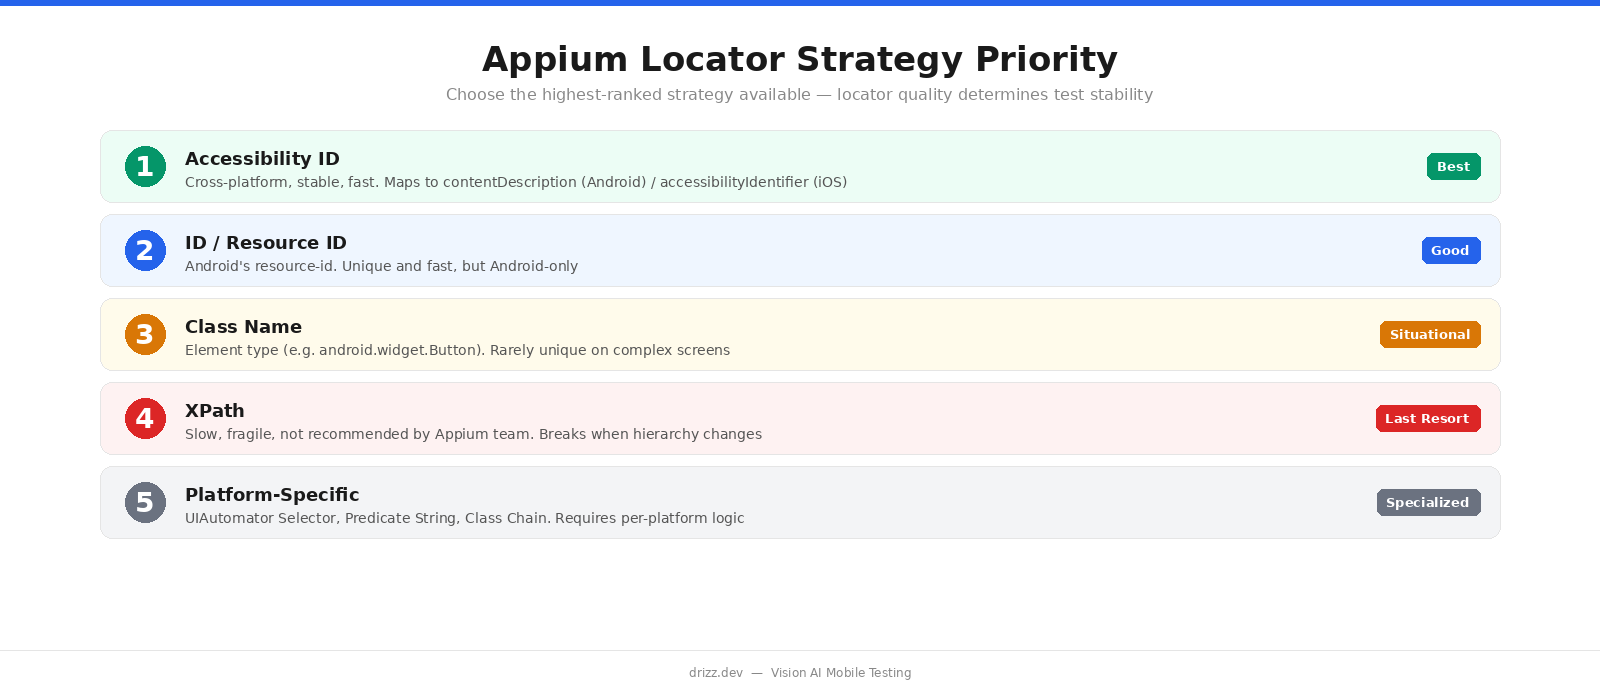
Inspector suggests locator strategies ranked by reliability. Here's the priority order every experienced Appium engineer follows:
1. Accessibility ID (Best) : Cross-platform, stable, and fast. Maps to contentDescription on Android and accessibilityIdentifier on iOS. If your developers set these, always use them first.
2. ID / Resource ID (Good) : Android's resource-id attribute. Unique and fast, but Android-only. Format: com.example.app:id/login_button.
3. Class Name (Situational) : The element type (android.widget.Button, XCUIElementTypeButton). Useful when only one element of that type exists on screen. Rarely unique enough on complex screens.
4. XPath (Last Resort) : Navigates the XML tree using path expressions. Extremely flexible can find any element but slow, fragile, and not recommended by the Appium team itself. XPath breaks when the hierarchy changes, which happens frequently during development.
5. Platform-Specific Strategies : Android offers UIAutomator Selector, Data Matcher, and View Matcher. iOS offers Predicate String and Class Chain. Powerful but require platform-specific knowledge and create separate locator logic per platform.
Step 4: Validate the Locator
Before pasting a locator into your test code, validate it in Inspector. Click the Search icon, select your locator strategy from the dropdown, paste the selector value, and hit Search. Inspector will tell you whether it found the element (and highlight it) or returned nothing.
This step catches bad locators before they become flaky tests.
Step 5: Copy and Use in Code
Once validated, copy the locator into your test script:
# Using the Accessibility ID Inspector suggestedlogin_button = driver.find_element(AppiumBy.ACCESSIBILITY_ID, "login-button")login_button.click()Step 6: Repeat for Every Element
Here's where the time adds up. For a single login flow email field, password field, login button, dashboard verification you repeat this cycle four times. For a checkout flow with address fields, payment inputs, confirmation buttons, and success screens, it could be 15-20 elements. Each one requires: click → read attributes → choose strategy → validate → copy → paste.
Multiply that across your entire app, and you understand why element inspection is the largest single time investment in Appium test creation.
Appium Inspector Best Practices
1. Prioritize Accessibility IDs Over Everything
Accessibility IDs are the gold standard. They're cross-platform (same locator works on Android and iOS), fast (direct lookup, no tree traversal), and stable (developers intentionally set them). If your app doesn't have accessibility IDs, work with your dev team to add them it benefits both testing and actual accessibility.
2. Avoid XPath Unless Absolutely Necessary
XPath is the fallback of fallbacks. It's slow because it scans the entire XML tree, and it's fragile because any change to the hierarchy: a new wrapper div, a reordered list, an added container breaks the path. The Appium team itself discourages XPath usage, especially on iOS where performance is significantly worse.
3. Save Capability Sets
If you test across multiple devices, OS versions, or app builds, save named capability sets in Inspector. It eliminates the tedious process of reconfiguring capabilities every time you switch contexts.
4. Use Inspector for Debugging, Not Just Setup
When a test fails with NoSuchElementException, open Inspector at the failing screen. Check whether the element's attributes changed, whether it moved in the hierarchy, or whether a loading state is hiding it. Inspector is your fastest debugging tool for locator-related failures.
5. Refresh the Source Frequently
Mobile screens are dynamic. After navigating, scrolling, or waiting for animations, click the Refresh button to get an updated screenshot and XML tree. Stale source data leads to selecting elements that no longer exist in their inspected state.
6. Coordinate with Developers
The quality of your locators depends on the quality of your app's accessibility markup. QA engineers shouldn't be guessing at XPaths because developers didn't add resource IDs. Establish a practice where developers assign meaningful accessibility IDs to all interactive elements; it pays dividends across testing, actual accessibility compliance, and long-term codebase quality.
The Inspector Workflow Problem
Appium Inspector is a well-built tool. It does exactly what it's designed to do, and it does it well. The problem isn't the Inspector, it's the underlying paradigm it serves.
Every Appium test requires you to:
- Open Inspector and connect to a session
- Navigate to each screen in your test flow
- Click on each element you need to interact with
- Evaluate which locator strategy is most stable
- Validate the locator
- Copy it into your test code
- Add explicit waits to handle timing
- Repeat for every element in every flow
For a team with 50 test cases covering 10+ user flows and 200+ element interactions, this process represents hundreds of hours of inspection, selection, and maintenance work.
And the work doesn't stop after initial creation. When a developer refactors a screen, updates a component library, or changes an element's resource-id, the locator breaks. Someone has to reopen the Inspector, find the new locator, update the test, and validate it works. This is the maintenance cycle that consumes 60-70% of QA engineering time at most organizations running Appium at scale.
The Inspector is the best tool available for this workflow. But what if the workflow itself is the bottleneck?
Why Drizz Doesn't Need an Inspector
Drizz takes a fundamentally different approach to mobile test automation. Instead of navigating XML element trees, copying locator strings, and hardcoding selectors into test scripts, Drizz uses Vision AI to see your app the way a human tester does through the screen.
Here's what that means in practice:
No Element Trees, No XML Source
When you write a Drizz test, you don't interact with an XML hierarchy at all. There's no page source to parse, no element tree to navigate, no attributes to evaluate. The AI looks at the rendered screen pixels, text, layout, visual context and identifies elements visually.
No Locator Strategies to Choose
There's no decision between Accessibility ID vs. XPath vs. Resource ID. You describe what you see:
- tap: "Login" button
- type: "user@example.com" into email field
- tap: "Submit" button
The Vision AI identifies the "Login button" the same way you would by recognizing the word "Login" on a tappable element. No locator. No selector. No strategy decision.
No Inspection Step
The entire Appium Inspector workflow open tool, connect session, click element, read attributes, choose strategy, validate, copy, paste is eliminated. You describe the user flow in plain English, and the AI handles element identification at runtime.
No Maintenance When UI Changes
This is the critical difference. When a developer changes a button's resource-id from login-btn to sign-in-button, every Appium test targeting that locator breaks. Someone has to reopen the Inspector, find the new ID, and update every affected test.
With Drizz, the button still says "Login" on screen. The Vision AI still sees "Login" on screen. The test still passes. No inspection needed. No update needed.
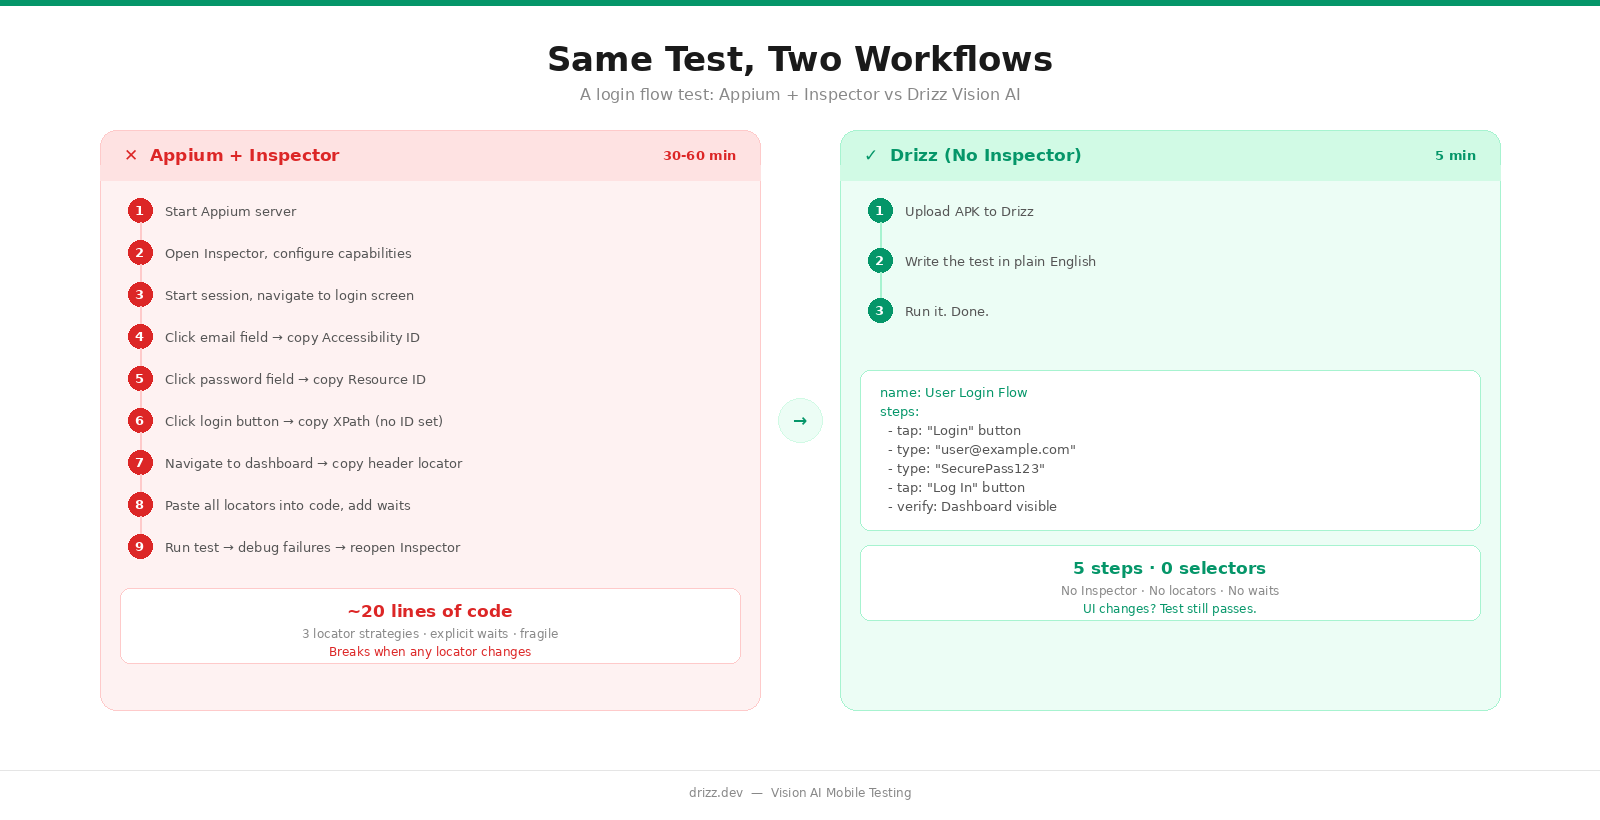
Side-by-Side: The Same Test, Two Workflows
Appium Workflow (with Inspector)
Time: 30-60 minutes per test case
- Start Appium server
- Open Inspector, configure capabilities, start session
- Navigate to login screen on the app
- Click email field → copy Accessibility ID → paste into code → add wait logic
- Click password field → copy Resource ID → paste into code → add wait logic
- Click login button → XPath is the only option (no ID set) → copy XPath → paste into code → add wait logic
- Navigate to dashboard → click header element → copy Accessibility ID → paste into code → add assertion
- Close Inspector session
- Run the test → debug failures → reopen Inspector → fix locators → repeat
# The result after all that Inspector work:
wait = WebDriverWait(driver, 15)

email = wait.until(EC.presence_of_element_located(
    (AppiumBy.ACCESSIBILITY_ID, "email-input")
))
email.send_keys("user@example.com")

password = driver.find_element(
    AppiumBy.ID, "com.example:id/password_field"
)
password.send_keys("SecurePass123")

login = driver.find_element(
    AppiumBy.XPATH,
    "//android.widget.Button[@text='Log In']"
)
login.click()

dashboard = wait.until(EC.presence_of_element_located(
    (AppiumBy.ACCESSIBILITY_ID, "dashboard-title")
))
assert dashboard.is_displayed()
Drizz Workflow (No Inspector)
Time: 5 minutes per test case
1. Upload APK to Drizz
2. Write the test:
name: User Login Flow
steps:
  - tap: "Login" button
  - type: "user@example.com" into email field
  - type: "SecurePass123" into password field
  - tap: "Log In" button
  - verify: Dashboard screen is visible
3. Run it. Done.
No Inspector. No locator decisions. No XPath fallbacks. No wait logic. No maintenance when the UI changes.
When You Still Need Appium Inspector
Appium Inspector remains a valuable tool in several scenarios, and we want to be clear about that:
Debugging complex native interactions. When you need to understand exactly how your app's UI hierarchy is structured, nested scroll views, custom components, platform-specific rendering Inspector gives you the deepest visibility available.
Working with apps that lack visual distinctiveness. If your app has multiple identical-looking buttons with no text labels (think icon-only navigation), Inspector helps you identify which element is which through their attributes rather than visual appearance.
Performance profiling. When you need precise element-level timing data such as how long it takes to find a specific element, how the hierarchy changes during animations Inspector's direct access to the XML source is invaluable.
Legacy Appium suite maintenance. If your team has an existing Appium test suite, Inspector is still the fastest way to debug locator failures and update broken selectors. It's the right tool for maintaining selector-based tests.
Building accessibility compliance. Inspector shows you which elements have proper accessibility labels and which don't, making it a useful audit tool for accessibility compliance, independent of test automation.
The key insight is this: Appium Inspector is essential for the selector-based workflow. It's the best tool ever built for finding, validating, and copying element locators. If you're writing Appium tests, you need an Inspector.
But if you're writing tests in plain English and letting Vision AI handle element identification, the Inspector's core job finding locators becomes unnecessary.
Getting Started with Drizz
If you're ready to skip the Inspector workflow entirely:
- Download Drizz Desktop from drizz.dev/start
- Connect your device USB or emulator
- Upload your app build No SDK changes, no accessibility ID requirements
- Write tests in plain English Describe what a human tester would do
- Run and iterate Vision AI handles identification, interaction, and verification
Your 20 most critical test cases can be running in CI/CD within a day without opening Appium Inspector once.
FAQ
What is Appium Inspector used for?
Appium Inspector is a GUI tool for visually inspecting mobile app elements during Appium testing. It shows you the app's UI hierarchy as an XML tree, displays element attributes (IDs, accessibility labels, class names), suggests locator strategies, and lets you interact with the app in real time. QA engineers use it to find the locators they need for writing Appium test scripts.
Is Appium Inspector free?
Yes. Appium Inspector is open-source and free to use. It's available as a standalone desktop app for macOS, Windows, and Linux, and as an Appium server plugin. Download it from the project's GitHub releases page.
Which locator strategy should I use in Appium?
The recommended priority order is: Accessibility ID (best cross-platform, fast, stable) → ID / Resource ID (good Android-specific, fast) → Class Name (situational rarely unique enough) → XPath (last resort slow, fragile, discouraged by the Appium team). Always validate your locator in Inspector before using it in code.
Why is XPath not recommended in Appium?
XPath scans the entire XML tree to find elements, which makes it slow. especially on iOS, where XCUITest's accessibility hierarchy is more deeply nested and expensive to serialize than Android's UiAutomator tree.It's also fragile: any change to the UI hierarchy (a new wrapper, reordered elements, added containers) can break the path expression. The Appium team itself recommends avoiding XPath in favor of Accessibility ID or Resource ID whenever possible.
Can I use Appium Inspector with cloud device labs?
Yes. Inspector has built-in integrations with BrowserStack, Sauce Labs, Perfecto, LambdaTest, and other cloud providers. Select your provider in the Session Builder, enter your credentials, and Inspector connects to a cloud-hosted device instead of a local one.
How is Drizz different from Appium Inspector?
Appium Inspector helps you find element locators (XPath, Accessibility ID, Resource ID) that you then hardcode into test scripts. Drizz eliminates this step entirely. Instead of inspecting elements and copying locators, you write tests in plain English ("tap the Login button") and Vision AI identifies elements visually at runtime with no inspection, no locators, no maintenance when the UI changes.
Can I migrate from Appium to Drizz without changing my app?
Yes. Drizz requires no SDK integration, no code changes, and no accessibility ID setup in your app. Upload your existing APK or IPA and start writing tests immediately. You can run Drizz alongside your existing Appium suite and migrate test cases incrementally.